When it comes to backyard BBQs and pitmaster skills, one dish that always takes the spotlight is low and slow smoked ribs. These fall-off-the-bone treats are a crowd pleaser and a staple in any BBQ lover's repertoire. In this guide, we will explore the best techniques and tips for achieving perfectly tender and flavorful ribs every time you fire up the grill.

What is the Best Temperature for Low and Slow Ribs?
One of the key factors in achieving tender and juicy ribs is maintaining the right temperature throughout the smoking process. The ideal temperature range for low and slow ribs is between 225 degrees F and 250 degrees F. It's important to note that the temperature at the grill grates may vary from the temperature displayed on your grill's thermometer, so it's a good idea to use a clip-on thermometer for accuracy. Remember to keep the smoker lid closed to ensure consistent heat and smoke circulation.
How to Slow Down Smoking Ribs
Now that we know the optimal temperature, let's dive into the tried and true 3-2-1 method for smoking ribs. This method is perfect for beginners and seasoned pitmasters alike. It involves three stages of cooking to achieve the perfect texture and flavor:
- Smoke for 3 hours: Start by smoking the ribs uncovered for three hours. This allows the ribs to develop a solid bark, which adds flavor and texture.
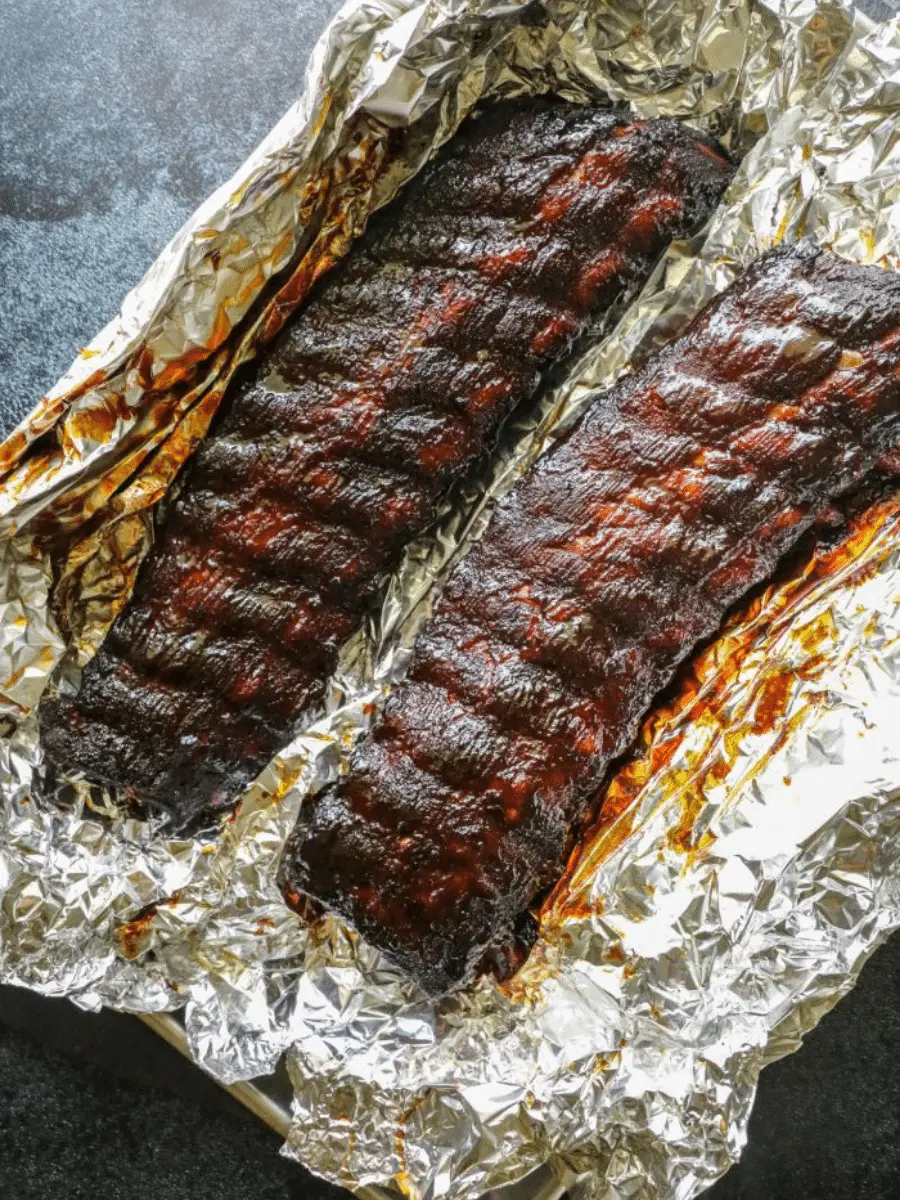
- Smoke for 2 hours wrapped tightly in aluminum foil: After the initial smoking period, wrap the ribs tightly in aluminum foil. This helps to tenderize the meat and encourages the flavors to meld together.
- Finish off with 1 hour uncovered: For the final stage, remove the foil and smoke the ribs uncovered for another hour. This helps to tighten up the bark and allows for a light saucing if desired.
Following the 3-2-1 method ensures that your ribs turn out consistently delicious and tender. It's a formula that is easy to remember and replicate, making it a go-to technique for many BBQ enthusiasts.
Preparing Your Ribs for Smoking
Before you begin the smoking process, it's essential to properly prepare your ribs. Here are some key steps to follow:
- Remove excess liquid: Take the ribs out of their packaging and pat them dry with a paper towel to remove any excess liquid.
- Remove the membrane: Place the ribs bone side up on a cutting board and remove the membrane across the back bones. This can be done by using a small pairing knife or a paper towel for better grip. Removing the membrane allows for a more tender bite and better penetration of the rub.
- Trim any silver skin and fat: Trim any silver skin or hanging fat from the ribs, as they won't break down well during the cooking process.
- Apply a binder and rub: Add a thin layer of your chosen binder, such as mustard, BBQ sauce, garlic paste, or olive oil, to help the rub adhere to the ribs. Apply your desired BBQ rub, whether it's a simple blend of salt, pepper, and garlic powder or a more complex recipe. Let the ribs rest for 45 minutes to an hour before placing them on the grill.
Properly preparing your ribs sets the foundation for a flavorful and tender end result.
Why Spray Your Ribs?
During the smoking process, you may have seen people spraying or mopping their BBQ. There are several reasons for this:
- Adds moisture and steam: Spraying the ribs with liquid, such as apple juice or watered-down apple cider vinegar, adds moisture and steam to the grill, keeping the rub moist.
- Prevents cracking and falling off: Spraying the bark on your ribs helps prevent it from cracking and falling off during the cooking process.
- Enhances smoke flavor: Smoke tends to adhere to liquids, so spraying your ribs helps to add more smoke flavor to the meat.
Spray your ribs every hour or as needed to maintain moisture and enhance the overall flavor profile.
Wrapping Ribs: To Wrap or Not to Wrap?
Wrapping ribs is a common practice in BBQ to speed up the cooking process and infuse additional flavors. While it's not necessary, it is a technique that can yield great results. Here's why you might consider wrapping your ribs:
- Cook faster at a lower temperature: Wrapping the ribs helps to cook them faster at a lower temperature, allowing the collagen and denser tissue to break down more quickly.
- Infuse flavors: Wrapping provides an opportunity to infuse flavors into the meat. You can add ingredients like butter, brown sugar, honey, barbecue sauces, dry rubs, or any other flavor enhancers you prefer.
If you choose to wrap your ribs, it's recommended to use foil over butcher paper for a tight seal. This prevents steaming and helps the flavors penetrate the meat more effectively.
When to Sauce Your Ribs
Saucing your ribs is a personal preference. If you decide to sauce your ribs, it's best to do so during the last 30 minutes of cooking. Applying the sauce earlier may cause the sugars in the sauce to caramelize too much. Lightly baste the sauce on the ribs and let it set for 15 minutes before adding a second coat. This ensures a beautiful color and a flavorful finish. Choose your favorite BBQ sauce or try a Kansas City style sauce for a tangy and sweet flavor profile.
How to Know When Your Ribs are Done
While the 3-2-1 method provides a general guideline for cooking times, it's always best to rely on visual and temperature cues to determine when your ribs are done. Here are a few indicators:
- The bark is set: The surface of the ribs should have a firm bark that is well-developed.
- Bones are peaking out: The bones should be peeking out, and the meat should have pulled back towards the center of the rack.
- Bend test: If you were to pick up the rack of ribs with tongs, it should bend quite a bit at the center, indicating tenderness.
- Temperature check: The most reliable way to determine doneness is by using a meat thermometer. The meat should reach an internal temperature of over 195 degrees F to around 205 degrees F for optimal tenderness. Insert the thermometer into the thickest part of the meat, avoiding contact with the bones.
Once your ribs meet these criteria, they are ready to be enjoyed by you and your guests.
Frequently Asked Questions
Q: Can I use the 3-2-1 method for different types of ribs?
A: Absolutely! The 3-2-1 method works well for both spare ribs and baby back ribs. Adjust the cooking times accordingly based on the size and thickness of the ribs.
Q: What wood should I use for smoking ribs?
A: The choice of wood depends on personal preference. Popular options for smoking ribs include hickory, apple, cherry, and oak. Experiment with different wood flavors to find your favorite.
Q: Can I smoke ribs on a gas grill?
A: Yes, you can smoke ribs on a gas grill. Use a smoker box or wrap wood chips in foil and place them on the grill grates to create smoke. Maintain a low and consistent temperature by adjusting the burners accordingly.
Q: How can I prevent my ribs from drying out?
A: To prevent dry ribs, make sure to monitor the temperature and cooking time closely. Spraying or mopping the ribs with liquid throughout the smoking process helps to keep them moist. Additionally, wrapping the ribs can help retain moisture.
Q: Can I freeze leftover smoked ribs?
A: Yes, you can freeze leftover smoked ribs. Allow them to cool completely, then wrap them tightly in foil or place them in an airtight container. They can be frozen for up to three months. When ready to enjoy, thaw them in the refrigerator overnight and reheat them on the grill or in the oven.
Low and slow smoked ribs are a true BBQ classic that never fails to impress. By following the 3-2-1 method and paying attention to temperature, preparation, and cooking techniques, you can achieve ribs that are tender, flavorful, and a hit with your family and friends. So fire up the grill, grab your favorite BBQ rub, and get ready to enjoy some mouthwatering ribs that will make you the pitmaster of your neighborhood!
If you want to know other articles similar to Perfectly tender and flavorful low and slow smoked ribs: a bbq guide you can visit the Smoking category.
Related Articles